If you want a beautiful, natural, "just-blushed" look, you will love liquid blush! Choosing the right shade is important, but to really nail the natural finish, you have to master liquid blush application as well. Especially, to be able to transform a liquid blush application literal “streaky mess” into a beautiful, fresh, natural glow. So let’s have a look on how to master liquid blush application for a no-makeup look.
Before you grab your liquid blush, ensure that your skin is ready. Start with a clean and moisturized face, because hydrated skin makes blush easier to blend and helps it last throughout the day. If you are going to use a primer, make sure it is lightweight and non greasy, this helps to control blush slip. Avoid heavy skin creams before applying blush as they will combine with the blush and cause it to patch. Skin preparing is laying the groundwork, and without it even the best liquid blush will not look natural.
Using too much liquid blush is a common mistake. Most liquid blush bottles are designed for controlled use and need only a small dot–about the size of a pinhead–for each cheek. It's better to use less to start. It’s much easier to add more blush later than to deal with a heavy concentration of blush. Having too much blush makes it hard to blend and makes the look too heavy and unrefined. It’s far easier to add more than to take it away, so start small with your liquid blush.
Liquid blush dries quickly, which means that once you take the product from the bottle you need to work with it right away. Your fingers are the best blending tool in this situation. They warm the product slightly which will help it blend on your skin. Lightly dab the product on the apples of your cheeks and make your way up to the temples in a circular motion. If you choose to use a brush, a dense synthetic brush will do best. Make sure to remove the excess and relax the pressure to let the brush do the work for a soft and natural color.
Different skin types have different ways of handling liquid blush, so make adjustments based on your skin. For dry skin, spritz a little facial mist on your fingers before blending. This hydrates the skin more and helps the blush not cling to dry patches as much. Oily skin types should blot any excess oil first and then use a matte primer underneath the blush area to keep it in place. With combination skin, blend more on the edges of the T-zone where oil tends to collect and keep the apples of your cheeks a bit more pigmented to balance the look.
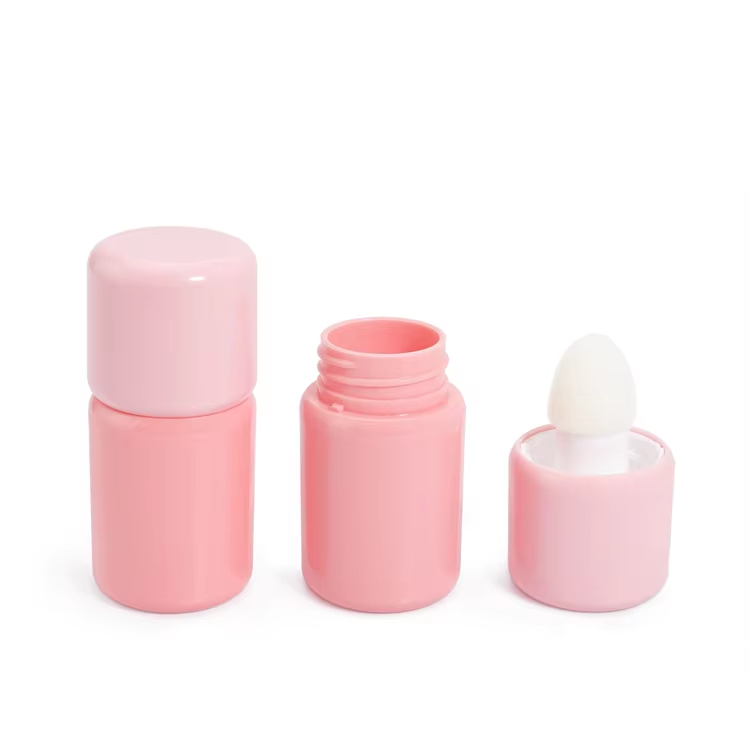
Caring for your liquid blush also means caring for the bottle. After use, take a clean tissue and wipe the nozzle or opening to remove any excess product. This helps to avoid clogs and keeps the formula fresh. Store the bottle away from heat and direct sunlight; heat and sunshine will spoil the formula and also change its color. If your bottle has a cap with a seal, your last step should be to secure it. This will avoid the product from drying out. A liquid blush bottle that is well maintained will always give you the best result.
Looking to take your liquid blush to the next level? Add a tiny bit of liquid highlighter to the blush on your wrist before applying. The blend will add a very natural shimmer. For a no makeup makeup day, add a tiny amount of blush on the tip of your nose and cupid’s bow for a natural flush. Don’t panic if you’ve added too much. With a sponge, add some moisturizer or foundation and gently blend over the area. This will take the excess blush off, without completely wiping it off.
As a leading one-stop cosmetic packaging supplier, BEYAQI designs and manufactures premium liquid blush bottles with precision dispensing nozzles, airless technology, and leak-proof seals, all customizable to match brand needs. Our airless bottle designs keep liquid formulas fresh and uncontaminated, while our tailored pump and nozzle options ensure controlled, mess-free application every time—exactly what you need for flawless liquid blush use. We offer fully customizable cosmetic packaging, from bottle shapes and materials to logo and color branding, all made with eco-friendly and high-quality craftsmanship that meets global industry standards. With BEYAQI’s packaging solutions, liquid blush application becomes even more effortless, turning every use into a seamless, natural beauty experience.